Creating a Print Ready PDF
A great print job has to start with great artwork. If a file is low resolution or doesn’t have bleed, or if it’s missing trim marks, it’s likely the result isn’t going to be as good as it could be. To follow are a few tips and tricks to make sure your files are great.
Great Design Starts with Indesign
First off – design your artwork in the right place. MS Word, Powerpoint or Publisher are definitely the wrong places. Don’t even be tempted. The result will be rubbish. Similarly, don’t be tempted to use Photoshop to create a print file. Photoshop is a fantastic tool for manipulating images but it isn’t a page layout program and if you try to use it as one, it’ll all end in tears.
Indesign is by far and away the most commonly used page layout program and most certainly is the right place to build your print files. Indesign is just the start however. It is a tool for creating a pdf and the pdf is what you send us to print from, not the raw Indesign file. The Indesign file is just a framework that all your links and text are gathered together in. If you send us the Indesign file we’d have to have all the same fonts that you have, the same images linked on our hard drive, all the same plug-ins…. it’s just not the right way to transport a file, but a pdf is.
PDF For Print
The PDF file format has been ingeniously designed for communicating your design with your printer. It has a lot of built in functionality that let’s you specify not just size and layout, but spot colours, process colours, overprints, dielines – everything you need to ensure your printer has all the information to print your document correctly. To create a good pdf, start with Indesign to create your design, then you export the file as a PDF (print). If you’re tempted to use something other than Indesign to create your pdf, be aware that you can create a pdf in many different ways, from many different types of software but just because you have a PDF, it doesn’t mean it’s a good PDF. If you have a Word document, and you export it as a pdf, that pdf will be no good to print from. If you want to create a good quality print file, start in the right place – Indesign.
Now that you are starting in the right place, let’s look at a few important steps to get right.
Setting up your document in Indesign
First, set your document up correctly. Go to File>Document Setup, and specify your document width and height. This is the actual finished size of your printed piece. In other words, this is the actual size the document will be trimmed down to once it’s printed and trimmed. Now set your bleed up at 3mm for all edges, and set your slug up at 10mm for all edges. Slug is often overlooked but is really important for when you finally export your document to a pdf – you’ll see why shortly.

Save your document set up settings and you should now notice you have a page view that shows a black line around your page – this is the finished page size. Imagine that when printed, your design is going to get trimmed on this black line – anything outside the black line gets trimmed off. You should also see a red line. This is the bleed line. If you have any background images or background colour, the image or block of colour can’t just finish on the trim line, but instead, it must extend past the trim line by 3mm (all the way to the red line).
Once you’ve created your design, your last step is to export the document as a pdf. Go to File>Export and select format of “pdf print”. A dialogue box will open. We won’t go through all the settings (most can be left as the default) but we are going to look at two of the settings: Marks and Bleeds and Compression.
Compression
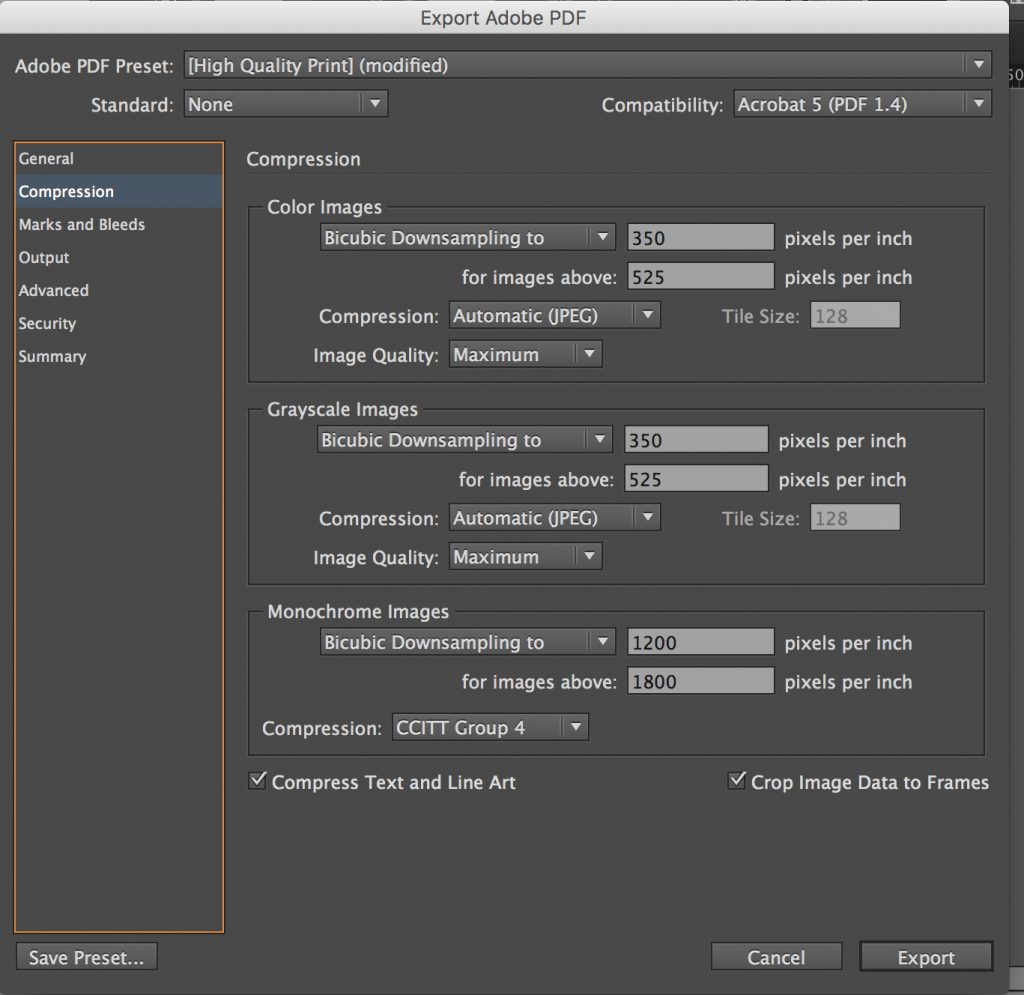
If you’re outputting to print, a resolution of 350dpi is more than enough resolution for your images. Your text and vector objects won’t be affected by the resolution setting (they’ll come out perfectly sharp regardless of the resolution). Have a look at the screenshot here and for most print purposes you’ll be able to copy the same settings for your document.

Marks and Bleed
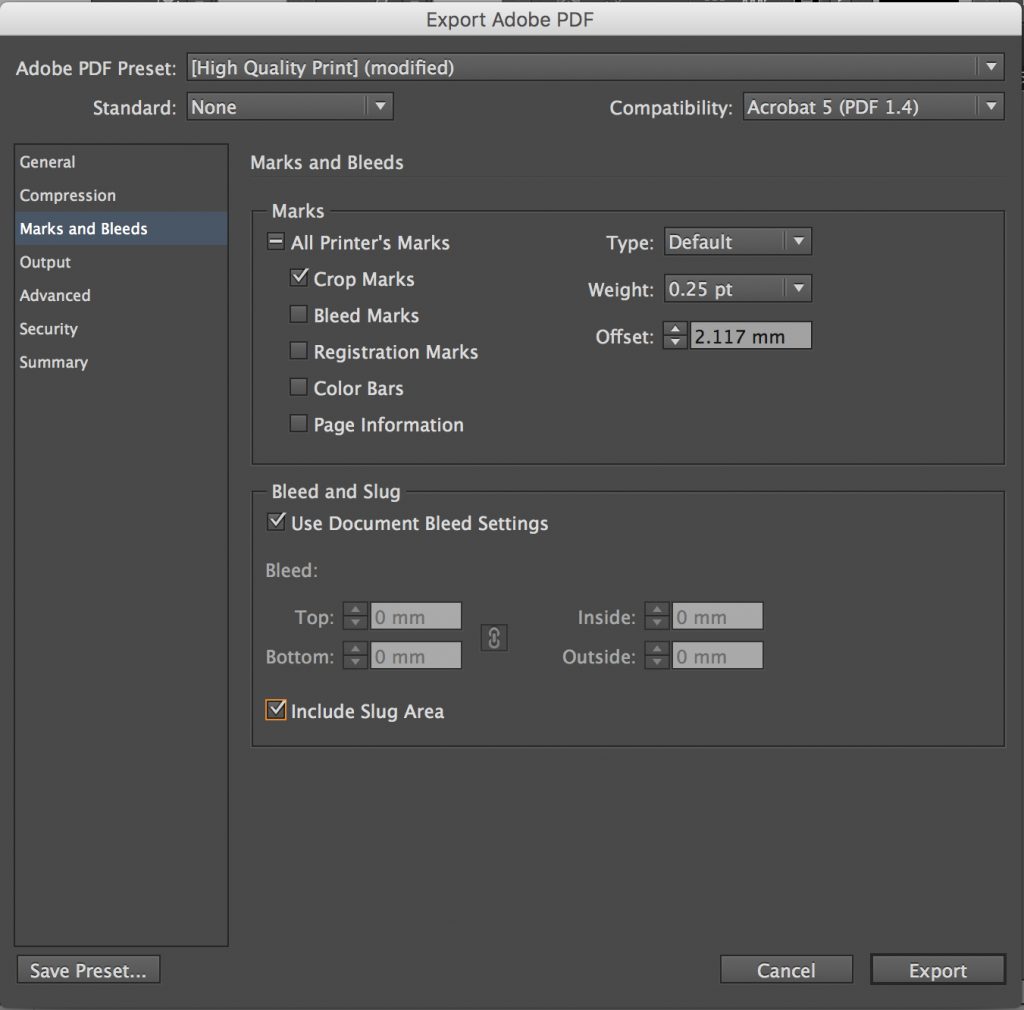
You could potentially put all manner of marks on your page, but the main one we want is “Crop Marks”. You’ll see in the screenshot here that we’ve checked the crop marks box. You’ll also see that we’ve checked the box “Use Document Bleed Settings”. This tells the program to include the bleed area in your pdf. Of course, you’ll actually have to have some element in the bleed area of your document for this to have any relevance.
Finally, we are also going to tick the box that says “Include Slug Area”. This tells the pr

ogram that you want the slug area included in your pdf. You’ll remember that earlier we promised to tell you why the slug area is so important. If you hadn’t specified a slug area when you were setting up your document, there wouldn’t be a slug area to include – and the reason you need a slug area is because the crop marks won’t have anywhere to sit without it.
You can now go ahead and export. The result should be a print ready pdf that will print beautifully.

 Save your document set up settings and you should now notice you have a page view that shows a black line around your page – this is the finished page size. Imagine that when printed, your design is going to get trimmed on this black line – anything outside the black line gets trimmed off. You should also see a red line. This is the bleed line. If you have any background images or background colour, the image or block of colour can’t just finish on the trim line, but instead, it must extend past the trim line by 3mm (all the way to the red line).
Once you’ve created your design, your last step is to export the document as a pdf. Go to File>Export and select format of “pdf print”. A dialogue box will open. We won’t go through all the settings (most can be left as the default) but we are going to look at two of the settings: Marks and Bleeds and Compression.

 ogram that you want the slug area included in your pdf. You’ll remember that earlier we promised to tell you why the slug area is so important. If you hadn’t specified a slug area when you were setting up your document, there wouldn’t be a slug area to include – and the reason you need a slug area is because the crop marks won’t have anywhere to sit without it.
You can now go ahead and export. The result should be a print ready pdf that will print beautifully.